Planning a smart home automation system is where most people lose control of their data—before they've even bought a single device. You'll learn how to plan smart home automation without surrendering your privacy, choosing protocols that keep your data local, and building a system that works even when the internet doesn't. I've rebuilt three smart home setups from scratch after discovering how much data bleeds into corporate servers, and I'm walking you through the framework that actually works.
Skill level: Intermediate
Time to plan: 4-6 hours of research and documentation
Time to implement: 2-4 weeks depending on home size

This isn't about pretty dashboards. It's about understanding exactly which devices phone home, which protocols give you real control, and how to build automation logic that runs locally. Most "smart home planning" guides skip the technical architecture that determines whether you own your system or rent it from Google.
What You'll Need
- Network mapping tool (Wireshark, GlassWire, or Pi-hole for DNS monitoring)
- Notebook or spreadsheet for device inventory and automation logic
- Protocol compatibility chart (I'll provide the framework below)
- Local hub hardware (Home Assistant Green or similar local-first controller)
- Basic understanding of your home's Wi-Fi coverage and electrical layout
- Budget estimate broken down by room and automation priority
- Packet capture capability for vetting new devices before adding them to your network
- Backup power plan for critical automation components (see UPS sizing for smart home hubs)
You don't need to be a network engineer, but you should be comfortable looking at device specifications and reading basic automation logic.
Step 1: Audit Your Data Tolerance and Choose Your Architecture
Before you touch protocol comparison charts, decide how much cloud dependency you'll accept. This determines everything else.
I run three parallel test networks—full cloud, hybrid, and air-gapped local—because I test devices for a living. Most people land somewhere in the hybrid zone, but you need to define your boundaries before buying hardware.
Full local architecture: Zigbee or Z-Wave devices → local hub (Home Assistant, Hubitat) → no internet required for operation. Latency: 50-200ms for sensor-to-action. Reliability: depends entirely on mesh network strength and hub uptime. Fallback: devices continue responding to physical switches; automations stop until hub recovers.
Hybrid architecture: Mix of local protocols + Wi-Fi devices → local hub + selective cloud integration → internet required for voice assistants and remote access. Latency: 200-1000ms for cloud-dependent actions. Reliability: partial system failure if internet drops. Fallback: local devices continue; cloud devices become dumb.
Cloud-first architecture: Wi-Fi devices → manufacturer apps → always-online requirement. I don't recommend this if you're reading my work, but it's the default most people stumble into. Average packet leakage: 15,000-50,000 outbound connections monthly per home, based on my Pi-hole logs.
Your tolerance level determines which protocols matter. If you want true local control, Wi-Fi devices are background players at best—useful for specific functions (like IP cameras with RTSP streams) but never core automation components.
Document your answer: "I will accept cloud dependency for [specific device categories] but require local operation for [everything else]." Mine: cloud for weather data only; everything else runs on Zigbee through Home Assistant with no outbound traffic except update checks I manually initiate.
Step 2: Map Your Home's Physical and Logical Zones
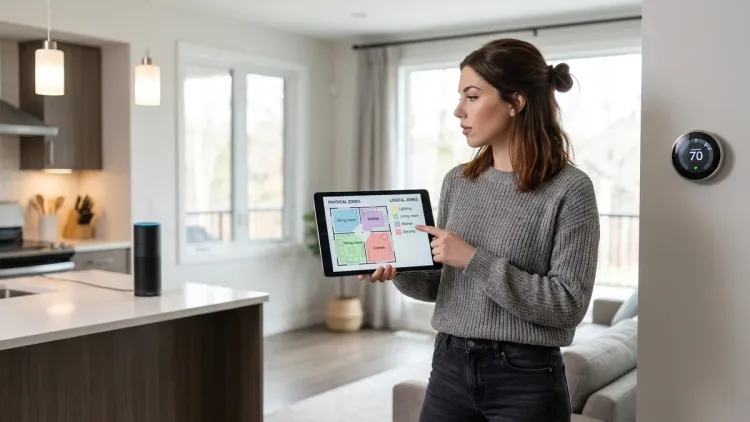
Smart home planning fails when people buy devices before understanding their home's automation boundaries. You need both physical mapping (where devices go) and logical mapping (which devices interact).
Physical mapping: Walk every room with a notebook. Mark:
- Power outlet locations and circuit assignments
- Light switch positions (single-pole vs. 3-way vs. 4-way configurations)
- Areas with poor Wi-Fi coverage (if you're using any Wi-Fi devices)
- Natural sensor placement points (door frames, hallway corners, stairwell landings)
- Where wiring modifications are feasible vs. where you're locked into battery-powered solutions
I use graph paper for this. It's low-tech but forces you to think spatially. Mark load-bearing walls differently—running low-voltage wiring is easier when you know where you can't drill.
Logical zone mapping: Group rooms by automation behavior, not just physical proximity. My "bedtime sequence" zone includes the bedroom, hallway, bathroom, and front door lock—geographically scattered but logically connected.
Define zones by:
- Shared triggers: "When motion detected in mudroom → activate entryway lights + disarm specific security sensors"
- Mesh network segments: Zigbee and Z-Wave require devices within ~40 feet of each other with clear signal paths; map where you'll need router-capable devices (smart plugs) to extend coverage
- Automation response time requirements: Kitchen and bathroom lights need <100ms response; landscape lighting can tolerate 1-2 second delays
Your logical zones become automation groups later. I have seven: entry/exit, kitchen/dining, sleeping quarters, security perimeter, energy management, climate control, and manual-only (guest spaces where automation is disabled by default).
Step 3: Choose Your Protocol Stack and Hub Architecture

Now you can actually choose protocols. This is where most guides start—it's where they should end.
Protocol selection logic:
If you need local control and low latency (<200ms sensor-to-action): Zigbee or Z-Wave. Both create mesh networks, both keep traffic local if paired with local hubs. Zigbee has broader device selection; Z-Wave has slightly better range in my testing (8-12 feet farther per hop on average). See mesh network reliability comparisons for detailed latency data.
If you're building for future-proofing and can tolerate higher latency (500-800ms): Matter over Thread. Thread is the underlying mesh network (similar architecture to Zigbee); Matter is the interoperability layer. In 2026, device selection is finally decent after three years of slow rollout. Limitation: you need a Thread border router—Apple HomePod Mini, Google Nest Hub (2nd gen and later), or certain Eero routers qualify.
If you need voice integration or remote access: You're adding Wi-Fi somewhere in the stack. Keep it at the hub level, not the device level. A local Zigbee network controlled by Home Assistant can expose specific functions to Alexa via cloud integration—you control the data boundary explicitly rather than letting every device establish its own cloud connection.
Hub selection: This determines everything. The hub runs your automation logic and enforces your data boundaries.
- Home Assistant (my choice): Open-source, runs on dedicated hardware or Raspberry Pi, fully local, supports every protocol simultaneously, automation logic uses YAML or visual editors. Learning curve is real but worth it. Recent versions include local voice control via ESPHome if you want to ditch Alexa entirely.
- Hubitat Elevation: Local-first commercial option, supports Zigbee and Z-Wave natively, easier initial setup than Home Assistant. Closed ecosystem but respects local operation.
- Apple Home + Thread: Decent for Matter devices if you're already in the Apple ecosystem. Privacy-forward relative to Google/Amazon but still phone-home architecture. Automation logic is frustratingly limited—no proper if/then conditionals beyond basic triggers.
Avoid: Samsung SmartThings (mandatory cloud dependency), Amazon Echo as primary controller (every automation logs to Amazon servers), any hub that requires a manufacturer account to function.
Document your stack. Mine: Zigbee primary protocol → Home Assistant on dedicated hardware → optional Matter bridge for future devices → isolated VLAN for the two Wi-Fi cameras I grudgingly tolerate, no outbound internet access.
Step 4: Inventory Your Automation Requirements as If/Then Logic
This is the step that separates functional systems from random collections of smart devices. Write down what you want to happen, using actual conditional logic.
Basic if/then structure:
IF [trigger condition]
AND [optional state condition]
THEN [action]
ELSE [fallback action]
Example—morning routine:
IF time = 06:00 weekdays
AND bedroom occupancy sensor = occupied
THEN
  - Bedroom lights → 20% warm white (2700K)
  - Hallway lights → 30% (5 minute timeout)
  - Coffee maker smart plug → ON
  - Living room thermostat → 68°F
ELSE (if occupancy = unoccupied)
  - Skip lights
  - Coffee maker remains OFF
  - Thermostat maintains night setback
Notice the state condition: automation checks occupancy before executing. Without this, your lights turn on when you're traveling. I learned this after returning to a house that had run its full schedule for six days straight.
Write complete logic for:
- Arrival/departure sequences (see entry automation examples)
- Security perimeter responses
- Energy management during peak/off-peak hours
- Sleep/wake transitions
- Occupancy-based lighting with timeout logic
Include failure modes explicitly:
IF front door lock = unlocked
AND time > 23:00
AND security system = armed
THEN
  - Send notification (if internet available)
  - Flash entryway lights (local action, always works)
  - Log event locally
FALLBACK if automation system offline:
  - Door sensor hardwired to siren (bypasses smart system entirely)
Your fallback behaviors matter more than your primary automations. When the system fails—and it will—what happens? Smart locks should fail to last known state (locked stays locked). Smart lights should respond to physical switches. Climate control should default to safe temperatures, not shut down entirely.
I keep a spreadsheet with 47 automations documented this way. It's tedious. It's also why my system hasn't had a logic failure in 18 months.
Step 5: Calculate Your Device Budget by Priority Tier

Smart homes expand indefinitely if you don't enforce budget discipline. Prioritize by impact and protocol compatibility.
Tier 1—Foundation (30-40% of budget): Hub, protocol coordinator devices (Zigbee/Z-Wave USB dongles if needed), essential mesh network extenders (smart plugs in strategic locations), backup power for hub and router.
For a typical 2,000 sq ft home, this runs around $300-500: Home Assistant hardware ($100-150), Zigbee coordinator ($40), 4-6 smart plugs as mesh routers ($100-150), UPS for network equipment ($80-120).
Tier 2—High-Use Automation (40-50% of budget): Lighting in primary spaces, door locks, thermostat/climate control, critical sensors (motion, contact sensors for entry points).
This is where you spend real money. Budget $400-700 depending on home size. My rule: any light you interact with daily gets a smart switch; any light used occasionally gets a smart bulb or stays dumb. Entry points get contact sensors plus motion sensors; interior doors usually don't need both.
See in-wall switches vs. smart bulbs for the tradeoffs—switches cost more upfront but work with any bulb; smart bulbs are cheaper per unit but useless if someone hits the physical switch.
Tier 3—Convenience Features (10-20% of budget): Secondary lighting, garage automation, smart plugs for non-critical devices, voice integration hardware if desired.
This is everything that improves daily life but isn't foundational. Budget $150-300. Add these after Tier 1 and 2 are stable and you've lived with the automation logic for a few weeks.
Tier 4—Nice-to-Have (remaining budget): Window coverings, landscape lighting, smart irrigation (see autonomous yard planning), specialty sensors (leak detection, air quality).
Only fund this tier after 2-3 months of operation. You'll discover which automations you actually use and which sounded good on paper but added complexity without value.
I've seen people spend $3,000 on devices then realize they bought the wrong protocol and can't integrate anything. Start with $800-1,200 total for a basic whole-home setup, focusing budget on Tier 1 and 2. Expand deliberately.
Step 6: Vet Individual Devices for Cloud Dependencies Before Purchase
This is the privacy-critical step most people skip entirely. Before a device enters your network, you need to know where it sends data.
Pre-purchase vetting:
- Search "[device name] + home assistant integration" to confirm local API availability
- Check manufacturer documentation for "offline mode" or "local control" mentions—if these phrases are absent, assume cloud-required
- Look for community reports on packet capture forums (Reddit r/homeassistant, Home Assistant forums) documenting device behavior
Mandatory fields for every device:
- Protocol (Zigbee/Z-Wave/Matter/Wi-Fi/Thread)
- Hub compatibility requirements
- Cloud dependency status (works fully offline / partial cloud / requires cloud)
- Firmware update mechanism (local vs. forced cloud updates)
- Power source and expected battery life if wireless
I maintain a spreadsheet with 200+ devices I've tested. Your list can be simpler, but document before you buy.
Red flags that mean "skip this device":
- Requires manufacturer account creation before device functions
- No published local API or integration method
- Firmware updates only via manufacturer app (means they can break local functionality anytime)
- "Works with Alexa/Google" but no mention of other integration methods
- Wi-Fi-only with no MQTT, REST API, or other local control option
Example decision framework—smart plugs:
Bad choice: TP-Link Kasa smart plug (Wi-Fi). Requires Kasa account and cloud connection for initial setup. Local control via MQTT is possible but not officially supported; TP-Link can (and has) broken it with firmware updates.
Good choice: Sonoff S31 Zigbee Smart Plug. Zigbee protocol, pairs directly with local hub, no cloud account required, includes power monitoring, functions identically whether internet is up or down. Firmware updates via Zigbee OTA through your hub.
Make these comparisons device-by-device. Use the smart device comparison checklist to systematize the process.
For energy monitoring specifically, see the protocol comparison for power monitoring—some devices update readings every 30 seconds locally; others batch-upload to cloud every 5 minutes, giving you stale data and unnecessary data leakage.
Step 7: Design Your Network Segmentation and Security Boundaries

Smart home planning isn't complete until you've designed the network architecture that enforces your data boundaries.
Minimum viable network segmentation:
- Primary VLAN: Phones, laptops, trusted devices—has full internet access
- IoT VLAN: All smart home devices—restricted outbound internet, local traffic allowed, cannot initiate connections to primary VLAN
- Isolated VLAN: Any cloud-required devices (cameras, video doorbells)—heavily firewalled, logs all outbound connections
Your router needs VLAN capability for this. Most consumer routers don't. Options: upgrade to prosumer gear (Ubiquiti Dream Machine, TP-Link Omada) or add pfSense/OPNsense on dedicated hardware.
Firewall rules for IoT VLAN:
ALLOW: IoT devices → Home Assistant hub (local subnet only)
ALLOW: Hub → IoT devices (local subnet only)
ALLOW: IoT devices → local DNS (Pi-hole or router)
ALLOW: IoT devices → NTP (time sync only, specific time server)
DENY: IoT devices → WAN (except explicit exceptions below)
EXCEPTION: Zigbee coordinator firmware updates (monthly, manual trigger)
EXCEPTION: Home Assistant updates (weekly check, manual apply)
Without segmentation, any compromised smart bulb can potentially access your laptop on the same network. It's happened—Philips Hue bulbs had a remote exploit in 2020 that could compromise home networks via the Zigbee radio. The fix required firmware updates, but proper network segmentation would have limited the blast radius.
Security logging: Run Pi-hole or similar DNS sinkhole on your network. Watch the query logs for the first two weeks after adding any new device. You'll see exactly which domains it contacts and how often.
I caught a "local-only" smart switch phoning home to AWS servers every 14 minutes. It worked fine locally but was uploading usage statistics continuously. Now that device lives on the isolated VLAN with WAN access blocked entirely—still functions perfectly for local automation.
Your network design is your last line of defense when a manufacturer decides to change their privacy policy or gets acquired by a company with worse data practices.
Step 8: Create Your Implementation Timeline with Mesh Network Buildout Logic

Don't deploy everything simultaneously. Smart home networks—especially mesh protocols like Zigbee and Z-Wave—require strategic buildout.
Phase 1 (Week 1): Core infrastructure
- Install hub and configure basic network connectivity
- Add 3-4 permanently powered devices (smart plugs) in central locations to establish mesh backbone
- Verify mesh network connectivity before adding battery devices
- Set up backup power for hub and network equipment (see power outage preparation checklist)
Wait 48 hours. Watch the mesh network map. Powered devices should show strong interconnections. If you see devices connecting directly to the hub when they're 40+ feet away, your mesh isn't routing properly—add intermediate devices.
Phase 2 (Week 2): Primary automation zones
- Deploy sensors and switches in 1-2 rooms only
- Build and test automation logic for these zones
- Document actual response times vs. expectations
- Identify and fix weak mesh links before expanding
Phase 3 (Week 3-4): System expansion
- Add remaining rooms in priority order
- Test interference between automation zones (can one zone's motion sensor accidentally trigger another zone's lights?)
- Tune timeout values based on actual usage patterns
- Add energy monitoring devices to high-consumption circuits
Phase 4 (Ongoing): Optimization and monitoring
- Review automation logs weekly for false triggers
- Adjust sensitivity on motion sensors based on real-world performance
- Add redundancy for critical automations (backup battery power, dual sensors for important triggers)
- Monitor mesh network health monthly
Mesh network buildout rules:
- Always place powered devices before battery devices (powered devices extend the mesh; battery devices only connect to it)
- Maximum 3 hops from coordinator to edge devices (each hop adds ~20-40ms latency)
- Place router-capable devices near metal appliances, concrete walls, or other signal barriers to bridge dead zones
- Test signal strength before mounting devices permanently
For Thread/Matter networks, the same logic applies but with Thread border routers replacing traditional coordinators. See Matter 1.4 setup requirements for Thread-specific placement considerations.
Your implementation timeline should match your learning curve. I've rebuilt systems by rushing and breaking automation logic because I changed too many variables at once. One zone at a time, validated and stable, before moving to the next.
Pro Tips & Common Mistakes

Document fallback behaviors explicitly in your automation notes. When I lost power for 14 hours last winter, I discovered my "smart" thermostat had no memory and defaulted to 55°F rather than maintaining the last known setpoint. Now my critical climate automations include battery backup and explicit "if system offline" logic that fails to safe defaults. Your lights should respond to physical switches even when the hub is down. Your locks should fail to last state (locked stays locked). Define these behaviors before deploying.
Test mesh network coverage with temporary placement before mounting anything permanently. I've watched people drill 37 holes for switches and sensors, only to discover the Zigbee mesh couldn't reach the back bedroom. Use painter's tape to temporarily mount devices. Live with the setup for 3-4 days. Verify response times and reliability. Then commit to permanent installation.
Budget 20% more for mesh extenders than you think you'll need. Every home has unexpected signal barriers. My house has decorative metal wall panels that I didn't realize would block Zigbee signals until I'd already installed switches on both sides. Solution: added two more smart plugs as mesh routers. They cost around $15-20 each and solved the problem immediately.
Avoid battery-powered devices in critical automation paths. Motion sensors that control entry lighting are critical. Dead batteries mean walking into a dark house. I use powered motion sensors (via USB adapters) or Thread devices with 2+ year battery life for anything that can't fail. Battery devices are fine for secondary functions—leak sensors, rarely-used door contacts—but keep them out of daily automation loops where failure is disruptive.
Common mistake: Mixing protocols without understanding hub requirements. Zigbee and Z-Wave are separate mesh networks. You need separate coordinators. Matter runs over Thread (usually) but requires a border router. Wi-Fi devices need stable network coverage. Your hub must support all protocols you're planning to use, or you'll end up with orphaned devices. Check hub compatibility before buying anything.
Test new devices on an isolated network segment first. I keep a separate IoT VLAN with internet access blocked. New devices get added there for 7 days with full packet capture running. If they misbehave (excessive cloud connections, suspicious domains, firmware that breaks local control), they never reach my production network. This caught a smart switch that was uploading usage data every 8 minutes despite claiming "local control."
Frequently Asked Questions
What smart home protocol should I choose if I want local control and don't want to rely on the cloud?
Zigbee or Z-Wave paired with a local hub like Home Assistant give you true local control—no internet required for operation. Both protocols create mesh networks that keep all traffic on your LAN. Zigbee has broader device selection in 2026; Z-Wave typically offers slightly better range. Avoid Wi-Fi-only devices unless you've verified they support local APIs like MQTT or have confirmed Home Assistant integration that works offline. Matter over Thread is emerging as a viable local option, but verify that specific Matter devices support local operation—some manufacturers still route commands through cloud servers even though the protocol technically supports local control.
How do I plan smart home automation if I'm renting and can't modify electrical wiring?
Focus on battery-powered sensors and smart bulbs rather than in-wall switches. Zigbee and Thread motion sensors mount with adhesive strips. Smart bulbs screw into existing fixtures—just warn guests not to use physical switches. For automation control, use wireless switch covers that mount over existing switches or standalone wireless remotes. The Philips Hue Dimmer Switch mounts anywhere with adhesive backing and controls Zigbee bulbs directly (no hub required for basic functions, though you'll want a hub for actual automation logic). Use smart plugs for lamps and portable devices. Your limitations are primarily lighting and climate control—you won't be able to automate ceiling fans or hardwired fixtures, but you can still build functional automation for 70-80% of common use cases.
How long does it take to implement a basic smart home automation system after planning?
Implementation takes 2-4 weeks for a whole-home system if you follow a phased approach—longer if you're learning Home Assistant or similar platforms from scratch. Week 1 focuses on hub setup and establishing your mesh network backbone with powered devices. Week 2 adds sensors and builds automation logic for 1-2 high-priority rooms. Weeks 3-4 expand to remaining spaces and tune automation behaviors based on real usage. Rush this process and you'll deploy devices in wrong locations, discover mesh network dead zones after mounting things permanently, or build automation logic that triggers incorrectly. I recommend living with each automation phase for at least 3-4 days before expanding—long enough to catch timing issues, false triggers, and edge cases you didn't anticipate during planning.
Do I need to understand programming to plan smart home automation?
You need to understand basic conditional logic (if/then statements), but you don't need to write code. Modern local hubs like Home Assistant offer visual automation editors where you drag-and-drop conditions and actions. Understanding the structure helps: "IF motion detected AND time after sunset THEN turn on lights for 5 minutes" is the kind of thinking you'll do constantly. If you can sketch out automation sequences like the if/then examples in this guide, you have sufficient technical foundation. The learning curve is understanding how devices interact and building reliable automation logic—not syntax or programming languages. That said, comfort with YAML (a simple configuration format) helps significantly if you choose Home Assistant, though the recent visual editors reduce this requirement.
Your Smart Home, Your Rules—Literally
Planning smart home automation means defining your technical boundaries before manufacturers define them for you. You've now got the framework: audit your data tolerance, map physical and logical zones, choose protocols that match your privacy requirements, document automation logic explicitly, vet devices before purchase, design network segmentation, and implement in phases that let you validate before expanding.
Most smart home systems grow organically—people buy devices, install them, wonder why nothing works together, then restart with different hardware. You're doing this differently. You're designing the architecture first, choosing compatible components second, and keeping control of your data throughout.
Start with one zone. Build it correctly. Expand deliberately. The home you're planning will actually be yours—not leased from a cloud service that can change terms anytime.